Showing posts with label MAC OS X. Show all posts

Dec 12, 2012

How To Install Windows XP In Mac Book With Boot Camp


There's been a lot written about Apple's dramatic release of Boot Camp, a free download that lets you repartition your Intel-based Mac's drive and install Windows XP as an alternative operating system, but even the magazine coverage I've seen doesn't give you screen-by-screen details. So let's see what we can do about that!
Your first step is to make sure you have an Intel-based Mac: any G4 or G5 Mac will not install Boot Camp and you won't be able to dual boot into Windows XP. You can still run an emulator like Microsoft Virtual PC, but it's an inferior solution and my own experience with VPC has been that it's glacial and useless for all but the most simplistic of Windows applications. You'll also need to be able to burn a CD during the process: make sure you have a blank, burnable CD disk on hand.
Now, download Boot Camp from the Apple site and double click on the ".dmg" disk image that's dropped onto your desktop. Here's what you'll see:
Apple Boot Camp Windows XP Dual Boot Installer: Finder Folder View
Your first step, as highlighted in the "Read Before You Install" document, is to print a copy of the Boot Camp Beta Installation & Setup Guide. Trust me, you'll want it!
Double-click on the "BootCampAssistant.pkg" icon and you'll be able to install the Boot Camp assistant:
Apple Boot Camp Windows XP Dual Boot Installer: Installing the Assistant
As with all Mac software installs, this will require you to type in your administrative password. It's probably the same as your default account password:
Apple Boot Camp Windows XP Dual Boot Installer: Authenticate
A few seconds of activity later, you'll have the software successfully copied onto your computer and can quit this first installer.
Now your first challenge: finding the new installation assistant! It turns out that the program is installed on your computer in Applications --> Utilities --> Boot Camp Assistant. Launch it and it's quite possible you'll see the same message I did:
Apple Boot Camp Windows XP Dual Boot Installer: Update Firmware
No huge problem. Quit by clicking the "Quit" button, then go to Apple's Support Downloads and check their Available Firmware Updates list to click directly to the firmware update for your own Intel system. For my Mini, I simply go back to the downloads page and scan down for the name of my system.
Once the correct firmware update is installed, you need to reboot, but not in the usual fashion. Instead, press and hold the power button on the Mini itself -- it takes about ten seconds -- until the power indicator light flashes repeatedly to begin the update. Your system will boot and you'll see the Apple icon and a progress bar:
Apple Boot Camp Windows XP Dual Boot Installer: Supplemental Photos
That will advance, it took me about 90 seconds total, and you'll reboot again, ready to go!
Finally, we're ready to actually start working with Boot Camp itself. The first step is to read all of Apple's warnings:
Apple Boot Camp Windows XP Dual Boot Installer: Warnings and Welcomes
Okay, now let's proceed. First choice: do we want to burn a Macintosh Drivers CD, which contains important device drivers for Windows XP so it can access the various hardware parts of the Mac, or do we already have one. I don't already have one, so I'll choose the default of "Burn a Macintosh Drivers CD now":
Apple Boot Camp Windows XP Dual Boot Installer: Burn Windows Drivers CDROM
I slip in the blank disk and the system tells me it's "ready to burn". Click "Burn" and it'll do everything necessary to create the Windows XP drivers CD. This took a few minutes on my Mini, but it wasn't terribly long.
Next step is much more exciting: it's time to partition the hard disk!
Partitioning is a geeky buzzword for something that will actually make a lot of sense to you, believe it or not. The idea is that if you have a large hard disk, why not configure it to act like two small hard disks? Or three? In this way, smart system administrators can isolate accounts, minimize out-of-disk-space errors and disruptions, and so on. With Apple Boot Camp, we'll want to partition the default disk to allow us to have one "disk" that represents the Windows XP world, and another "disk" that represents Mac OS X.
By default, Boot Camp offers up a pretty tiny partition for Windows, as you can see:
Apple Boot Camp Windows XP Dual Boot Installer: Create Second Partition
I'd recommend that you make it bigger if you're actually going to use Windows for anything important; Microsoft recommends 10GB as the smallest reasonable and functional partition, for example. If you're just playing, however, 5GB will probably work fine (until your first big game install). I'll make mine 8GB to be somewhere in the middle.
Change the partition sizes by clicking and dragging on the vertical bar between the two areas until you have the size or sizes you desire. With my Mini configuration, it left me with 66GB for Mac OS X, of which 20GB is free, and 8GB for Windows XP.
Once the partitions are set up as you desire, click on "Partition" and keep your fingers crossed (there is a slight chance it'll actually mangle everything on the disk. Not likely, but I would definitely recommend you do one good, clean backup before you start experimenting with Boot Camp).
The disk partition is what we Windows folk call non-destructive or dynamic, which means that you don't have to reformat and then reinstall everything on both "sides" of the partition. That's a very, very good thing. :-)
Once the partitioning is done, you're ready to install Windows itself:
Apple Boot Camp Windows XP Dual Boot Installer: Ready to Start WinXP Install
Fortunately, I have a pristine new copy of Microsoft Windows XP Pro with SP2 included for PCs without Windows (who would have thought I'd think of my Mac as a PC without Windows?) and that's what I'll use. My thanks to Microsoft for sending it along...
Insert the WinXP installation DVD, wait for it to be recognized by Mac OS X (it'll show up on your desktop with a cheery name like "VRMFPP_EN"), click on "Start Installation" and kiss Mac OS X goodbye.
After a bit, you'll see the unfamiliar blue screen of a Windows installation:
Apple Boot Camp Windows XP Dual Boot Installer: Supplemental Photos
Press ENTER or Return on the keyboard to continue, agree to the Microsoft warnings and legal restrictions page, and you'll finally get to the "choose partition" list:
Apple Boot Camp Windows XP Dual Boot Installer: Supplemental Photos
Take your time here to ensure that you pick the correct partition! You want to use Partition C: which should match the size you just set too: notice on my screen it's 8407MB, which is about 8GB, as expected. Move the highlight bar down to the correct partition and press Enter to actually install WinXP.
Now you need to pick a partition formatting option. The two main choices are NTFS or FAT. NTFS is more modern and supports very large partitions, but can't interoperate with Mac OS X. FAT, on the other hand, can't support partitions larger than 32GB, but is compatible with the Mac. You'll see why that's important later. For now, select FAT and do a full, not a quick, format:
Apple Boot Camp Windows XP Dual Boot Installer: Supplemental Photos
Now some time will pass while the partition is formatted using the Windows FAT32 format. It took my system about five minutes to fill in the progress bar:
Apple Boot Camp Windows XP Dual Boot Installer: Supplemental Photos
I won't document every single step involved in installing Windows XP as it's pretty straightforward. Just make sure you have your product key available for the verification step of the process. It's in the package within the Microsoft Windows XP disk, and it's really a good idea to use a new version of the OS rather than the same key you've used with other PCs in your office or home. Worst case, you can skip the verification step and have 30 days of "trial period" before you have to deal with finding a valid key to enter for verification purposes.
Once you've finished the full Windows XP install, which can take rather quite a while, your system will reboot and you'll want to eject the WinXP install disk and slip in the Mac drivers CD you burned earlier in the process.
With Windows, this is done by going to My Computer and right-clicking on the optical drive D: then selecting Eject. Slip in the Mac disk and everything should just automatically launch and start up. If not, look for and double click on the file Install Macintosh Drivers for Win XP.exe. Here's what you'll see:
Apple Boot Camp Windows XP Dual Boot Installer: Supplemental Photos
I admit, it's kind of weird to see a Mac installation program running within Windows XP on a Mac computer, but it's a brave new world out there.
Probably, during the installation process, you'll learn that various components of your Intel-based Macintosh haven't passed the Microsoft Windows compatibility test:
Apple Boot Camp Windows XP Dual Boot Installer: Supplemental Photos
Apple assures us that it's safe to continue anyway, so I did. Three times!
Then you get to go through a few waves of "new hardware found", and in all cases you can simply accept all the default settings for each wizard, as those guys in Redmond call 'em, and proceed. Finally, you'll get to the last configuration screen:
Apple Boot Camp Windows XP Dual Boot Installer: Supplemental Photos
Click "reboot now" and if the hardware compatibility Gods are smiling upon you, the Mac will reboot right into Windows and you'll be the proud owner of a Macintosh that can run Windows natively, astonishingly enough.
One last tip: to select which OS you want to run, hold down the OPTION key when you start up the Mac and you'll be able to see both Mac OS X and Windows XP:
Apple Boot Camp Windows XP Dual Boot Installer: Supplemental Photos
Use the arrow keys to move to the choice you desire, then press Enter or RETURN to select it and zoom into that mode.
When you do boot into Mac OS X, you'll notice that there's a new hard disk on your desktop too, called "NO NAME". Click on the name, count to five, and click again, then type "Windows XP" and you'll forevermore realize what it is. And yes, you can navigate through it and find your data files from when you're running Windows, but I'll talk about that in another article!
It's a long, tricky process, but I hope this explains exactly how to install and get running with Apple Boot Camp. Also, don't miss my tutorial on how to install Parallels to run Windows XP within Mac OS X, rather than having to reboot each time you want to switch systems.


Oct 31, 2012

Getting your Huawei modem working with Mac OS X Mountain Lion and Lion


You know the part before the upgrade where they tell you to check all of your applications before you upgrade? Well, last night I decided that it would be a great idea to upgrade my Mac from Snow Leopard to Lion. Turns out that perhaps wasn’t so great an idea after all when my Huawei USB 3G modem dongle decided that it wasn’t going to work since it wasn’t relevant for the new 64-bit only kernel. Oops, I should have checked first. But it isn’t a complete disaster!
Update: This appears to also work with Mountain Lion as well according to some comments at the bottom. It may not work for everyone but it does appear to work for some.

After frantically using Google to find a new driver to install and digging around the Huawei site trying to find a replacement driver I was getting to the point of doing some modifications to the com.apple.boot.plist file and restart my Mac with the i386 kernel instead of the x86-64 one that appears to now be the default.
In my many searches for a Mac OS X Lion compatible driver, I managed to find the following from mobile provider “3″ in UK. The link, http://ask3.three.co.uk/mbbdocs/drivers/apple_drivers.html, contains a link to “dongle drivers” for “Huawei dongles” that work for Mac OS X Lion (10.7). Sounds like a winner!
So I download the zip file and it extracts out to leave me with a “3Connect Installer”. Not quite what I want however all is not lost. You see applications on Mac OS X are actually folders in disguise commonly referred to as either “bundles” or “packages”. So right click on the “3Connect Installer” and select “Show Package Contents”. This opens up a view with only “Contents” listed, foiled? Don’t worry, double click into that directory and then into the “Resources” directory. Here we find a “mobilemanager.mpkg” file. Now “mpkg” is a package which means it has more goodies in it.
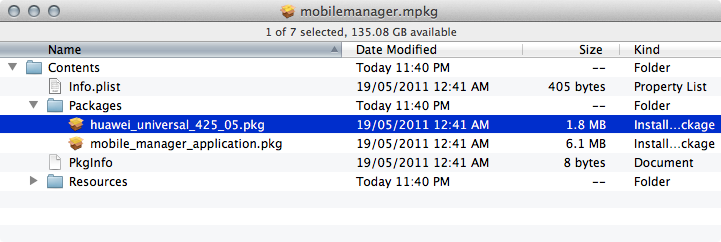
So we right click on this and select “Show Package Contents” again. We’ve got our “Contents” folder and inside that we want to go to the “Packages” folder. In there two packages exist: “mobile_manager_application.pkg” and “huawei_universal_425_05.pkg”. Now if you’re like me, everything is setup already – you just need the driver. So I skipped the mobile manager application and just double clicked on the “huawei_universal_425_05.pkg” file and installed it.
After installing the Huawei Universal package, the next time I plugged in my Huawei E160 into my Mac it was detected and worked perfectly fine.
So if you’ve just upgraded to Lion (now Mountain Lion too) and are trying to work out how to get your Huawei modem working properly with it, these instructions worked for me and I’m using it to write this post.
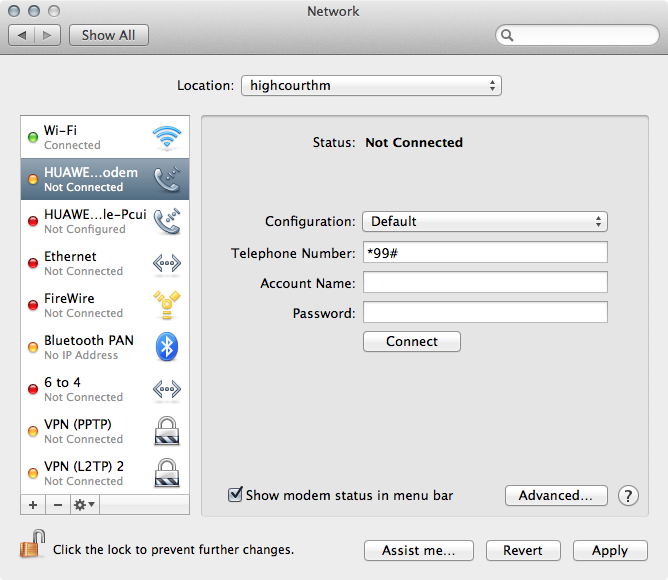
Update: It looks like *99# works rather universally as a telephone number for getting the modem to work. On Mountain Lion this is what the Network Preferences screen looks like:

HUAWEI Modem connect in MAC


I’ve been trying to get my USB Broadband Modem to work with Leopard for the past few days. Unfortunately the instructions that come with the modem from 3 (my network provider in australia) are out-of-date and don’t work.
So here are the steps to get the modem working:
1. Ignore the instructions that come with the modem (if you bought the modem from 3 in australia)
2. Download the drivers from here (updated link – drivers now hosted here) and install them onto your Mac. Make sure you install the second file in the zip. The first doesn’t work!
3. Plug the modem into your Mac’s USB port and wait until the modem stops flashinggreen.
4. Open up “Network Preferences” and click the “+” sign in the bottom left of the screen to add a new service:
5. Select the HUAWEI Mobile from the interface list and then give your Service a name:
6. Now setup your service by entering a telephone number of *99# but leave the Account Name and Password blank. Then click the Advanced button:
7. In the Advanced window select Generic as the vendor then GPRS (GSM/3G) as the model. Enter your APN for your provider (for 3 Postpaid in Australia it is 3netaccess – seebelow for a list of other known APN’s) and leave CID as 1.
8. Click Apply and then click the Connect button back on the Network Preferences window, and you should connect as below:
Another very handy tool is CheetahWatch which allows you to view your usage and is developed specifically for Mac and the HUAWEI modem.
Known APN’s (thanks everyone for posting these!):
all simcards india
  • Tata Docomo : TATA.DOCOMO.INTERNET
  • AirTel : airtelgprs.com
  • Idea : imis
  • Vodafone  : www
  • Aircel : aircelgprs
  • BSNL 3G : bsnlnet
  • Reliance : rcomwap   reliancegprs.com
  • Reliance GSM :  SMARTNET
  • Uninor : uninor
  • MTNL 3G Prepaid : pps3g
  • MTNL 3G Postpaid : mtnl3g
  • videocon GSM : vinternet.com
  • Tata Docomo 3G :TATADOCOMO3G

Oct 30, 2012

Common boot options for MAC OS X


Common boot opntios for Chimera, Chameleon, iBoot, and Unibeast


If your Hackintosh can't boot, changing your boot options with boot flags may be your last chance at getting Mac OS X to start. If you don't know, "boot flags" are options that change the way that your bootloader (the program that boots Mac OS X) runs at startup. Read past the break for list of common boot flags for iBoot, Unibeast, Chimera, Chameleon, and more.

LAST UPDATED ON: July 29, 2012 (Mountain Lion support)

-v
The mother of all boot flags. Entering -v into the bootloader turns on verbose mode, which is absolutely critical for fixing any Hackintosh issue. Verbose mode displays every single process that takes place during your bootup of Mac OS X. It can be rather intimidating, as it will display hundreds of lines of commands during the bootup process. However, if your Hackintosh isn't booting, then verbose mode should freeze at the exact point where the bootup process is tripping up. Take a photo of what verbose mode says before the bootup freezes. You can then post that photo on a Hackintosh forum to look for help, or try to use the results of verbose mode to guess what your problem is by yourself.

-x
Turns on safe mode. Mac OS X in safe mode ignores all kext files and boot settings except those which are absolutely necessary to booting the system. Safe mode is useful if you're trying to run the Mac OS X installer on a PC that's not fully compatible with Mac OS X. Also, if you accidentally installed a kext file that's messing up your Hackintosh, booting into safe mode may work around the problem. In safe mode, you can then remove the offending kext from /Extra/Extensions in your main hard drive (if you're running Mac OS X Snow Leopard), or /System/Library/Extensions (if you're running Mac OS X Lion or Mountain Lion).

-F
If you've entered some extra boot flags into org.Chameleon.boot.plist, but they're messing up your Hackintosh's bootloader, enter the -F boot flag to ignore them.

-f
Ignores kext caches during bootup on Mac OS X Snow Leopard. If you did not install a kext properly (usually because you forgot to run System Utilities in Multibeast after installing a new kext), your kext cache will be damaged, and Mac OS X might become unbootable unless you use this boot flag. The kext cache was replaced by the kernel cache in Mac OS X Lion, so theoretically, the -f boot flag should no longer work; however, this boot flag can still help some Hackintoshes boot (for reasons unknown).

UseKernelCache=Yes
Mac OS X Lion and Mountain Lion can use the kernel cache to install kexts, allowing Mac OS X to boot faster. However, the kernel cache is turned off by default, and you have to enable it by using the boot flag "UseKernelCache=Yes" (without quotation marks). Installing Easybeast or UserDSDT with Multibeast will automatically turn the kernel cache on for you. If Mac OS X is booting extremely slow on your Hackintosh, the kernel cache might be malfunctioning, and you can turn it off with "UseKernelCache=No" (without quotation marks). Turning off the kernel cache is equivalent to using the "-f" bootflag in Snow Leopard.

PCIRootUID=1
Some Hackintoshes will only boot when their "PCI Root ID" is set to 0. This usually happens with Hackintoshes that use a AMD Radeon graphics card. Other times, a Hackintosh will only boot when its "PCI Root ID" is set to 1. In some cases, the boot flag "PCIRootUID=1" will also fix Mac App Store verification errors.

npci=x2000
npci=x3000
If your verbose mode bootup of Mac OS X Lion or Mountain is freezing at [PCI Configuration Begin], enter the npci=0x3000 boot flag to fix it. This flag is applied by default when you install Easybeast or UserDSDT with Multibeast. The boot flag npci=x2000 does the same thing, except that it only works for Lion.

arch=i386
Forces Mac OS X to boot into 32-bit mode. Sometimes, your CPU or graphics card won't be fully supported in OS X unless you boot into 32-bit mode. Unlike in Windows, booting the 32-bit kernel for Mac OS X does not limit your total amount of RAM to 4 GB, and you can still run 64-bit applications. However, single applications cannot use up more than 4 GB of RAM, so this is a disadvantage if you do professional video editing, or something else that takes up a lot of RAM. This boot flag no longer works in OS X Mountain Lion.

arch=x86_64
Allows Mac OS X to boot into 64-bit mode. This boot flag is usually unnecessary, as Mac OS X Snow Leopard (and all versions beyond it) will boot into 64-bit mode by default.

-force64
Forces Mac OS X to boot into 64-bit mode. This is usually required to boot AMD Hackintoshes, especially on Hackintoshes with AMD's newer six-core processors. Interestingly, you can use the -force64 boot flag and the arch=i386 at the same time (I'm not sure what this will do, though).

cpus=1
This boot flag limits Mac OS X to using one core of your CPU. This boot flag is often necessary to launch the Mac OS X Snow Leopard installation DVD on a Hackintosh with an unsupported processor (ahem, AMD processors). However, you shouldn't have to use this boot flag once you've installed the legacy kernel.

busratio=20
The 20 is replaced with your CPU's bus ratio. This boot flag is usually used when you're installing Mac OS X Snow Leopard on a processor that's not supported (once again, AMD processors). Snow Leopard supports more processors than it used to, so this boot flag isn't as common as before. You can find a list of busratios for 2010-model Intel processors here. You can also find your busratio manually.

mach_kernel
This boot flag locates the kernel ("mach_kernel"), an important boot file for Mac OS X.  If your Hackintosh's verbose mode says that it can't find mach_kernel for some reason, entering this boot flag will help the bootloader find it (the kernel is usually found at the very base of the OS X file system). If you actually moved your kernel to somewhere else in your hard drive, change "mach_kernel" to wherever the kernel is located. For example, if the kernel is in the Extra folder of your main hard drive, enter the boot flag "/Extra/mach_kernel" (without quotation marks).

GraphicsEnabler=No
This turns Graphics Enabler off/on (you can set "No" to "Yes"). Graphics Enabler is a feature that helps Mac OS X work better with your graphics card, so it's turned on by default when you set up your Hackintosh with Multibeast. However, when used with certain graphics cards (especially AMD Radeon cards), Graphics Enabler may make Mac OS X unable to boot, or cause the graphics in Mac OS X to display incorrectly. If this is the case, try entering "GraphicsEnabler=No" (without quotations) instead. Turning GraphicsEnabler off will break DVD Player, as well as Geekbench, most games, most video editors, and certain other apps. Graphics cards from NVIDIA's 600 series no longer require GraphicsEnabler to work with Mac OS X; in that case, turning off GraphicsEnabler won't cause any negative effects.

debug=0x100
debug=0x144
Turns on debug mode. If you use either of these boot flags, and Mac OS X gets a kernel panic (which is the Mac version of the blue screen of death), you'll see a debug screen full of code instead of a generic "You need to restart your computer" message.

darkwake=0
The DarkWake feature in Mac OS X Lion and Mountain Lion allows you to wake up certain parts of your Mac from sleep, while leaving other parts in sleep mode. Unfortunately, this feature often messes up sleep on Hackintoshes. Enter this bootflag to turn it off (enter darkwake=1 to turn it on, if turning it off doesn't do the trick). Additionally, if your verbose bootup is freezing at a bunch of commands that mention "SleepEnabler.kext", entering darkwake=0 should be able to turn SleepEnabler.kext off. (Once you boot into OS X, be sure to remove SleepEnabler.kext completely by deleting it from either /Extra/Extensions or /System/Library/Extensions in your hard drive.)